Friday, September 17, 2010

The Best Biscotti Ever!

Buo Cibo
I couldn't help myself! These biscotti looked so wonderful that I ordered a dozen of the coffee toffee and a dozen of the dark chocolate drippled brownie.
Well, today, they were delivered and OH, MY GOODNESS! 
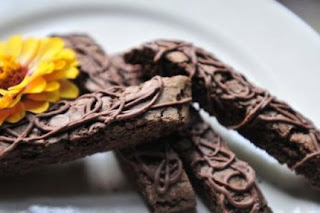
I can't even begin to describe how absolutely delicious they are! Please, please try this shop at Etsy! I promise you won't be disappointed! I found it completely by accident but you have no excuse because how I've told you about Buon Cibo. You can order at http://www.ashleeglen.etsy.com/.

Bon appétit!


Wednesday, August 4, 2010

Peanut Brittle


I have always loved peanut brittle since childhood when my grandmother would make large batches of it in an iron fryin' pan. But, it wasn't until tonight that I finally decided to try my hand at this age old recipe.
I dug through loads of cookbooks I've collected over the years (grandmother never told me the recipe... I was the taster) and selected two which seemed to be doable. I wanted it to be simple and use ingredients that I already had on hand. Well... I did have to make a quick trip to the grocery to purchase a bag of raw peanuts.
For some reason, I wasn't satisfied with the two recipes I'd found so I made a last ditch effort to locate an easier recipe on the internet. The first site contained about 10 recipes but none of them caught my eye. Ingredients were similar but the one which had a 5-star rating also had "difficult" beside it.
Just when I was about to give up for the night, I came across this recipe - simple, tested and rated with 5 stars and with a name like Mama's best peanut brittle I thought, "How can I go wrong!" It is absolutely wonderful and for that reason I decided to share it with my fellow bloggers and friends.
First, a word of caution... assemble ALL the ingredients and have them handy because once the sugar begins to reach the proper temperature you'll have to move at light speed so you won't burn the peanuts and sugar and before it begins to solidify.
First, lightly spray a cookie sheet with non-stick spray.
Next, into a large sauce pan, (I used an aluminum frying pan) put :
1 cup sugar
1/4 teaspoon salt
Don't turn on the heat yet.
Next, I measured (into little plastic containers but use what you've got):
1/2 cup of light corn syrup
1/4 cup water
Then, I set aside:
2 tablespoons softened butter ( I just cut the stick on the 2 Tblsp line and set it aside)
1 teaspoon baking soda
1 cup of raw peanuts ( I'd shelled them the night before and, let me tell you... DON'T buy them in the shell if you can avoid it because the skins stick to raw peanuts and you have to scrape them off! What was I thinking???? It took me two hours to prepare 2 cups.. I'm saving one cup for another batch with coconut added)
O.K. here's the easy part:
You've got your sugar and salt on the stove in the pan . Turn the heat to medium/high and pour in the water and corn syrup. Begin stirring until the sugar is dissolved and not grainy. Oh, about 4 or 5 minutes.
Add the peanuts
Stir, stir, stir
NOW, if you have a candy thermometer, you let the syrup mixture reach 300 degrees. BUT, if you're like me and you DON'T have a candy thermometer here's what you'll have to do.
Watch the sugar mixture carefully. It will begin to turn a light tan and then gradually begin to thicken, bubbling the entire time. White foamy bubbles will form. Continue stirring!
The peanuts will slowly begin to tan. When the syrup reaches the correct temperature it will darken quickly and become a golden AMBER color and be very sticky. Remove from heat (just tranfer the pan to an eye on the stove that isn't on) QUICKLY add the butter stirring rapidly. Add the baking soda. Stir rapidly. Quickly pour the mixture onto the cookie sheet and spread it thin. It will begin to solidy very fast but will still be too hot to break into pieces.
Let it cool completely, then break into pieces and enjoy!

Wednesday, July 7, 2010

I'm Gaga for You!


I suppose you could say I'm a glutton for punishment, but nothing gets me motivated like the tag "experienced" in a pattern description.

Well, this time, I almost met my match!


You know, "Vogue Knitting" has been around for eons but I'd rarely seen a "Vogue Knitting.. Crochet" mag, so when I spied this one (sporting Jennifer Flaven Stallone on the cover, no less) I snapped it up. It's just chock full of gorgeous crochet patterns, some labeled "very easy" others, "experienced". Of course, knowing me and my love of puzzles, I was instantly drawn to the "experienced" patterns. I must confess that I never actually tried one until now and let me tell you...it is one of those, "I'll sleep on it" kind of deals! Whew! They weren't kidding when they labeled it "experienced". Honestly... if you aren't good at reading minds, DON"T attempt this pattern! (lol)


I've been working on it now for 2 days and as I near completion, I have a new found respect for designers. Pattern writing is no easy task and when you've got a pattern with as many twists and turns as this one I can fully understand why the designer would think that only an experienced person would understand some of the tiny bits of information left out. I mean, after all, the pattern took up two single-spaced pages of the magazine and part of a third page.

Now, take into account that I DIDN'T use the yarn or the hook size recommended ( yeah, I'm a rebel like that) the finished garment has more "umph" to it because it's a 4 ply cotton yarn.

So, now that I see that I've conquered this one, it's on to the next "Experienced" pattern ( Ha! I laugh in your face!)......

a dramatic 3/4 length granny square jacket in beige and black. Gorgeous!

I've never seen a "Vogue Knitting... Crochet" magazine since but I'm sure having fun making all the fabulous creations in this one!


Wednesday, June 23, 2010

Another of My Favorite Reborn Artists

One of my FAVORITE reborn artists is Stacey Haskins of HaskinsHeavenlyBabies.

As you can see, from the pictures posted of this beautiful reborn doll, Stacey uses only the finest quality products in her reborn process.

Baby's hair is soft and silky and is rooted strand by strand and actually appears to be growing right out of her scalp. Stacey only uses the best of the best in mohair when selecting "hair" for her babies.


Another thing that you'll notice about Stacey's babies is her attention to details and the beautiful skintone on each of her reborns. She uses subtle shading techniques and paints layer upon layer of translucent paints to achieve a very realistic appearance. If you'd like to own one of her beautiful creations, she can be reached on her website, http://www.haskinsheavenlybabies.com/ This is a collectible that you'll treasure for years to come. You'll see many of her "adopted" babies on her site. Enjoy!

Sunday, June 20, 2010

The Process of Reborning

When you look at the beautiful finished product, you may never have considered all that went into bringing this work of art into existence. It truly is a painstakingly laborious process that takes as much patience as it does skill. There are some artists who simply have a gift; others have acquired their skill through years of practice. It is obvious that they love what they do.


This is a behind-the-scenes look at the shyann sculpt (in the previous post) that was done by Jennifer Skidgel of Bunker Babies Nursery. She's one of the truly gifted artists of reborning.


Thursday, June 10, 2010

The Art of Reborning


Some time last year I decided I needed a baby to model my crochet and knit creations. I wondered how that would work, what with the unpredictability of babies not to mention that I'd need to work around their "eating/sleeping" patterns. The thought occurred to me that I might want to simply purchase a doll. Thus began my introduction to the fascinating art of "Reborning".

Reborn artists really have to love their work because completing a single doll can take 6 to 8 weeks from start to finish. With each progressive step, the doll begins to look more and more like a real baby. I'd like to introduce you to one of the dolls in my collection, a Shyann " created by master reborn artist, Jen Skidgel of "Bunker Babies Nursery".

Once the head, arms, and legs are washed clean of any residue, the task of handpainting begins. The baby is given thin coats of special paints which are baked on, layer by layer. Veins, shading, and creases are added to give the baby a more realistic appearance and after the artist is satisfied with the skintone, she can begin the task of detailing and "rooting".

Detailing involves applying eyelashes, sometimes one by one, eyebrows, lip shading and color, and sometimes birthmarks and/ or little scratches (little babies have really sharp nails). Baby receives a manicure and pedicure and eyes.

One of the most intriguing steps in this process is the "rooting" of the baby's hair. Mohair is most often used in this step and there are grades of mohair from "basic to best" (my wording). The best mohair is soft and silky and most resembles a real baby's hair. The process of rooting can take up to two weeks if done properly. Even with close inspection, it looks like the "hair" is growing directly from the scalp.

Finally, the doll's body can be stuffed with special materials to give it the weight and feel of a real baby and the head, arms, and legs are attached.

Once finished, you have a true work of art to be treasured for years to come. A true collectible from one of the best!
You can reach Jennifer Skidgel on her website at:
http://www.freewebs.com/jbbn/index.htm

Monday, May 3, 2010

Happy Birthday, Irelyn!


Happy Birthday, to you
Happy Birthday, to you,
Happy Birthday,
Dear Irelyn

Happy Birthday to you!

You look soooo cute in your little clown hat. I hope you had a wonderful birthday.

Thank you for sending the customer appreciation photo. :-D


Sunday, April 4, 2010


Baby Mason


Happy Easter, Mason and thank you, Christa, for sharing pics of your adorable little man in one of my baby bunny hats!


Mason has the most beautiful big, blue eyes, doesn't he?

Sunday, March 28, 2010

Little Irelyn in her custom Bunny Hat


I always love hearing from my customers and I'm especially excited when I receive pictures of their sweet babies wearing one of my creations.
This is baby Irelyn (isn't that an ADORABLE name?) wearing a fuzzy pink flopppy-eared bunny hat. She has the biggest, bluest eyes and the sweetest face and I think she's on her way to becoming the next Gerber model.
Thanks, mom, for sharing your little angel with me!

Sunday, March 21, 2010

Introducing Baby Brooks


This is another of my darling baby customers wearing a baby bunny hat. His name is Brooks and he's just too adorable for words. His mama, Courtney was kind enough to send photos so we could all enjoy his sweet little face! Thanks, Courtney!

Saturday, March 20, 2010

Crazy Quilt


I saw a quilt years ago called a "Crazy Quilt" which used a free-form technique of simply crocheting whatever you felt at the moment. Each square, line, or squiggle was added to part of the quilt wherever you chose and the quilt grew until it was the size needed. There is no pattern and , I suppose, that's what makes this so much fun! You can relax and just see where the quilt leads you. I've been working on this one longer than I'd care to admit but each time I pick it up it appears new and I seem to see another part of it that I'd forgotten about creating. One day it will be finished and I'll mail it off to Chicago to a dear friend and fashion designer. I know she'll be shocked and, hopefully, very happy that she'll have a treasure to pass along.

Tuesday, February 16, 2010

Photography by Rachelle Yakubu

Not too long ago, a very talented photographer, Rachelle Yakubu, asked me to crochet a basket holder and bunny hat for her photography studio. Today, Rachelle shared the results of that endeavor. Thank you, Rachelle, for allowing me to play a part in the beautiful works of art you create with your camera!


Enjoy, friends!


Saturday, January 2, 2010

Welcome Reborn Artist Stacey Haskins


This beautiful little baby was done by reborn artist, Stacey Haskins of Haskins Heavenly Babies. I fell in love with her sweet little face and the awesome job that Stacey did re-borning her. Just look at that hair, put in strand by strand. Stacey's a true artist! If you'd like to have one of her "babies" please visit her website at:
www.haskinsheavenlybabies.webs.com. You certainly won't be disappointed. Keep an eye out for this precious little angel to show up in my shop real soon!